Footwear Render View Coverage Matrix
A useful set of footwear render angles should let reviewers inspect visible design decisions without treating concept imagery as physical validation. Use a coverage matrix: assign each view to a decision, record what it reveals, and mark what remains unresolved.
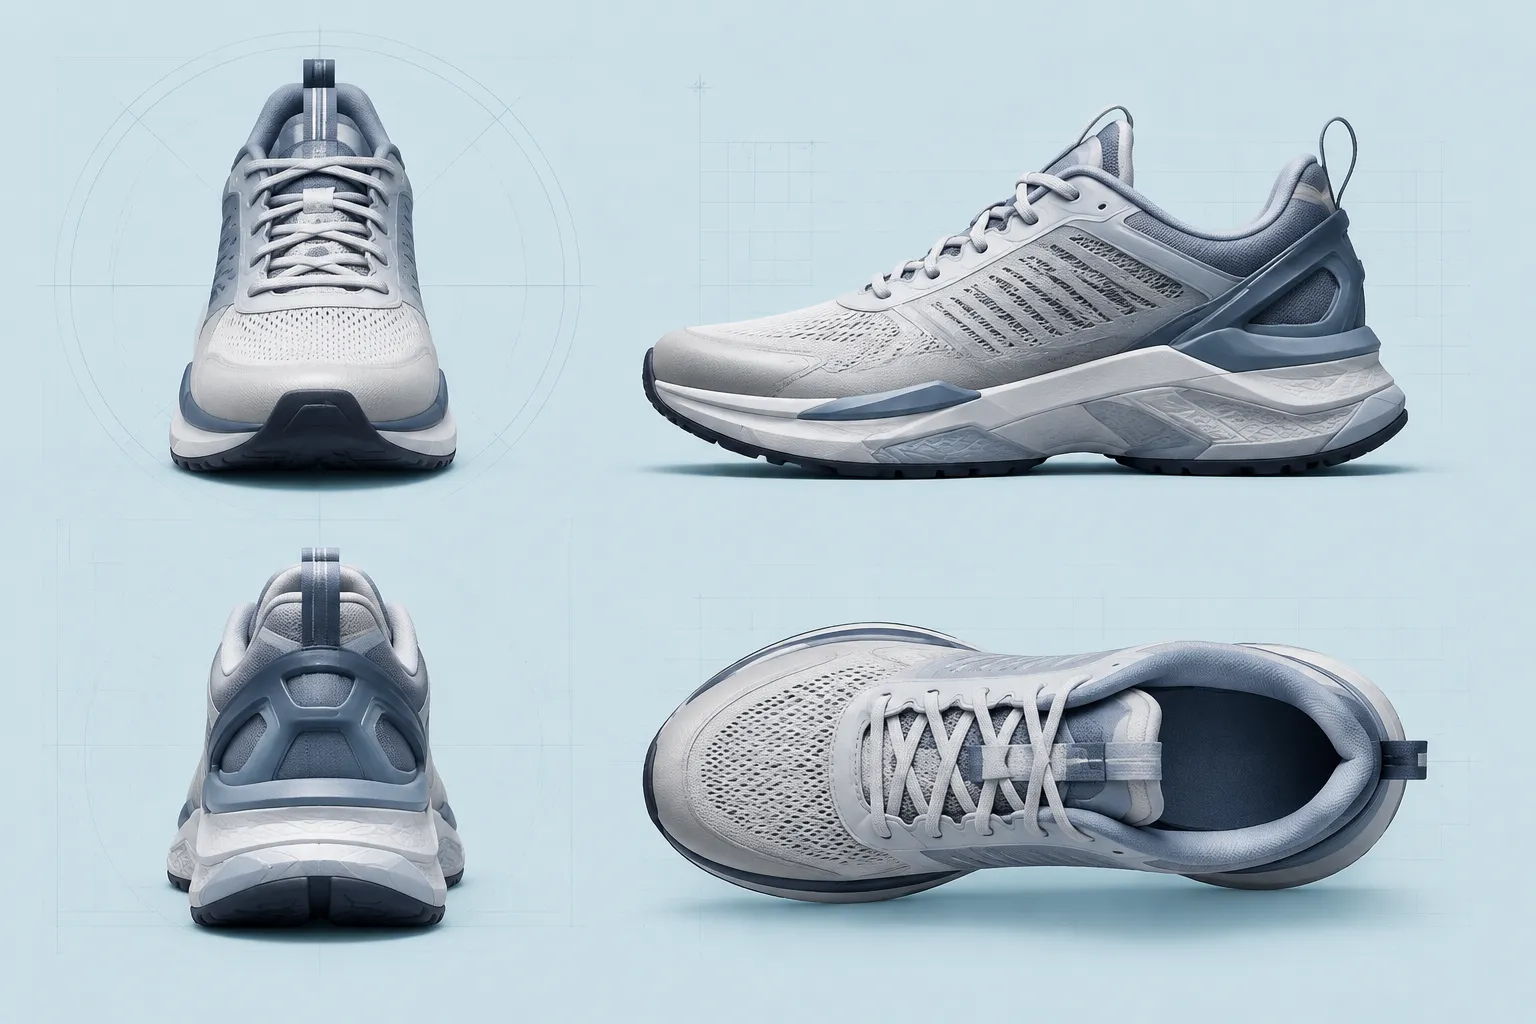
No universal angle standard is established by the available material. Adjust the matrix for the silhouette, upper construction, number of colorways, and review stage.
Start With the Review Decision
Define the decision before requesting images. “Show the shoe from every angle” is too broad to guide production or review.
A workable brief names the visible question:
- Does the silhouette read consistently from the front, side, and rear?
- Are the upper panels and overlays separated clearly?
- Does the colorway preserve the intended relationships between zones?
- Do material cues remain distinguishable under the selected lighting?
- Can reviewers identify the difference between two variants?
- Is the outsole concept visible enough for a design discussion?
- Which details need a closer crop or material study?
A concept render can show form, surface appearance, color relationships, framing, and construction intent. It cannot establish fit, comfort, durability, physical performance, safety, manufacturability, or product approval.
Footwear Render-Angle Matrix
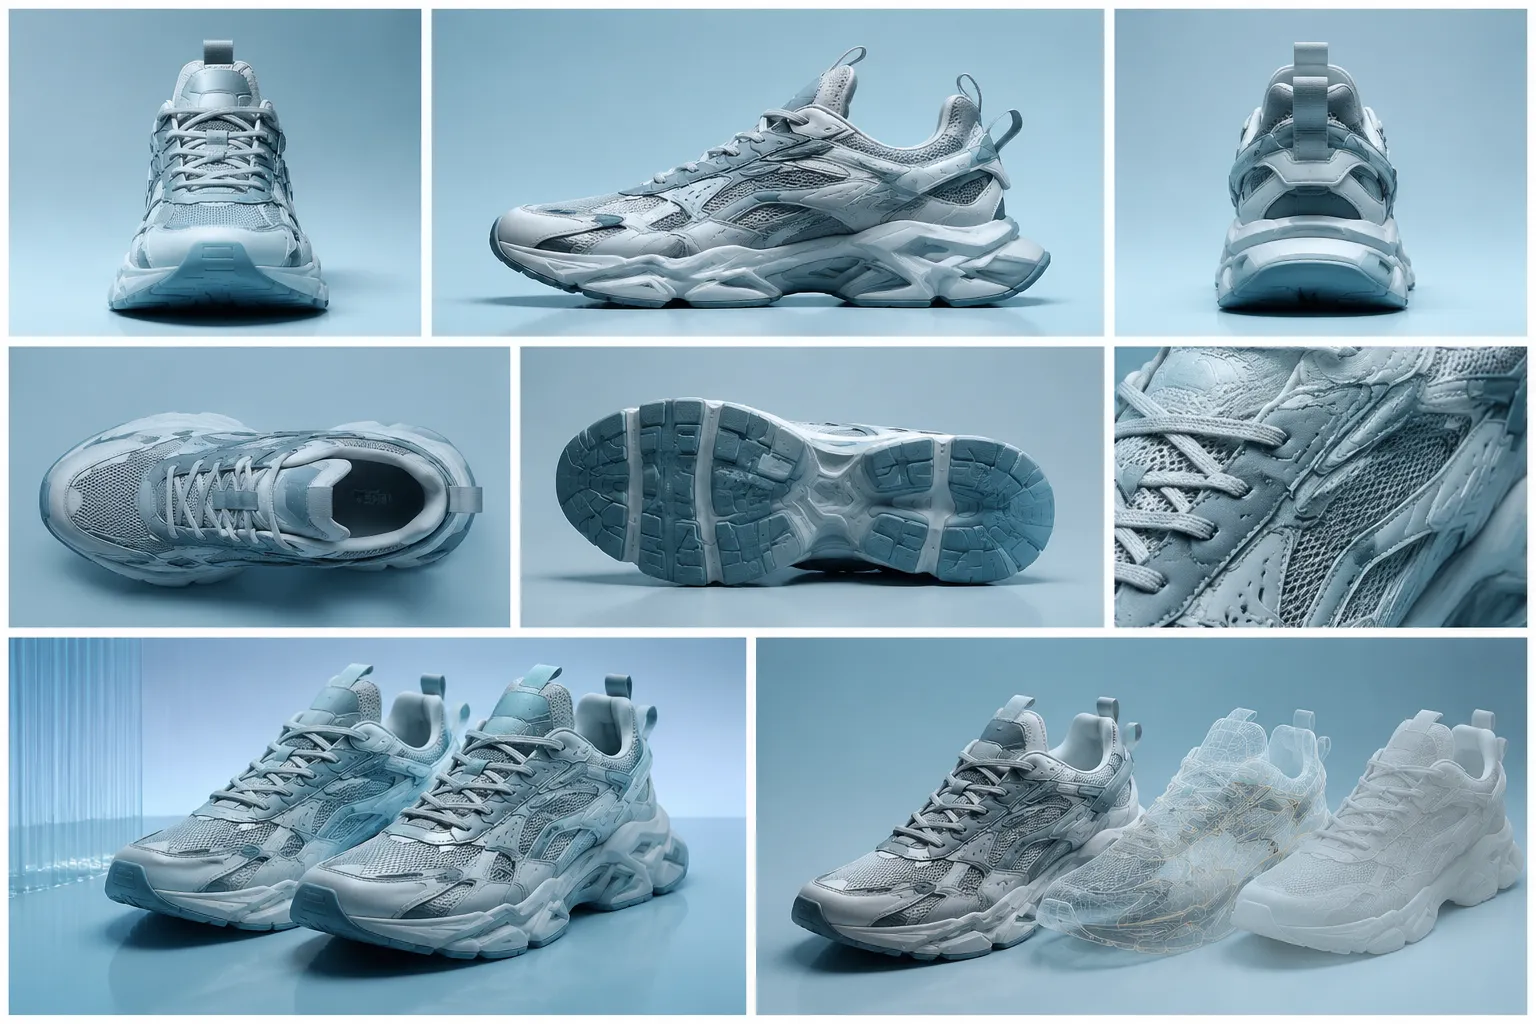
| View | Primary decision | Visible checks | Common limitation |
|---|---|---|---|
| Front render view | Front silhouette and toe treatment | Toe shape, tongue position, forefoot color balance | Depth, fit, and actual forefoot volume remain unresolved |
| Side render view | Profile and proportion | Heel-to-toe line, collar height, eyestay flow, midsole profile, upper zoning | The opposite side and hidden construction cannot be inspected |
| Rear render view | Heel structure and back alignment | Heel-counter appearance, rear seam, collar opening, branding, symmetry cues | Internal support and heel retention are not demonstrated |
| Top render view | Opening, vamp, and upper layout | Tongue, throat, lacing path, toe-box outline, panel relationships | The view can flatten height and hide lateral transitions |
| Outsole render view | Tread and bottom-pattern direction | Lug arrangement, rubber-zone separation, perimeter shape, logo placement | Grip, flexibility, wear, and contact behavior require physical evaluation |
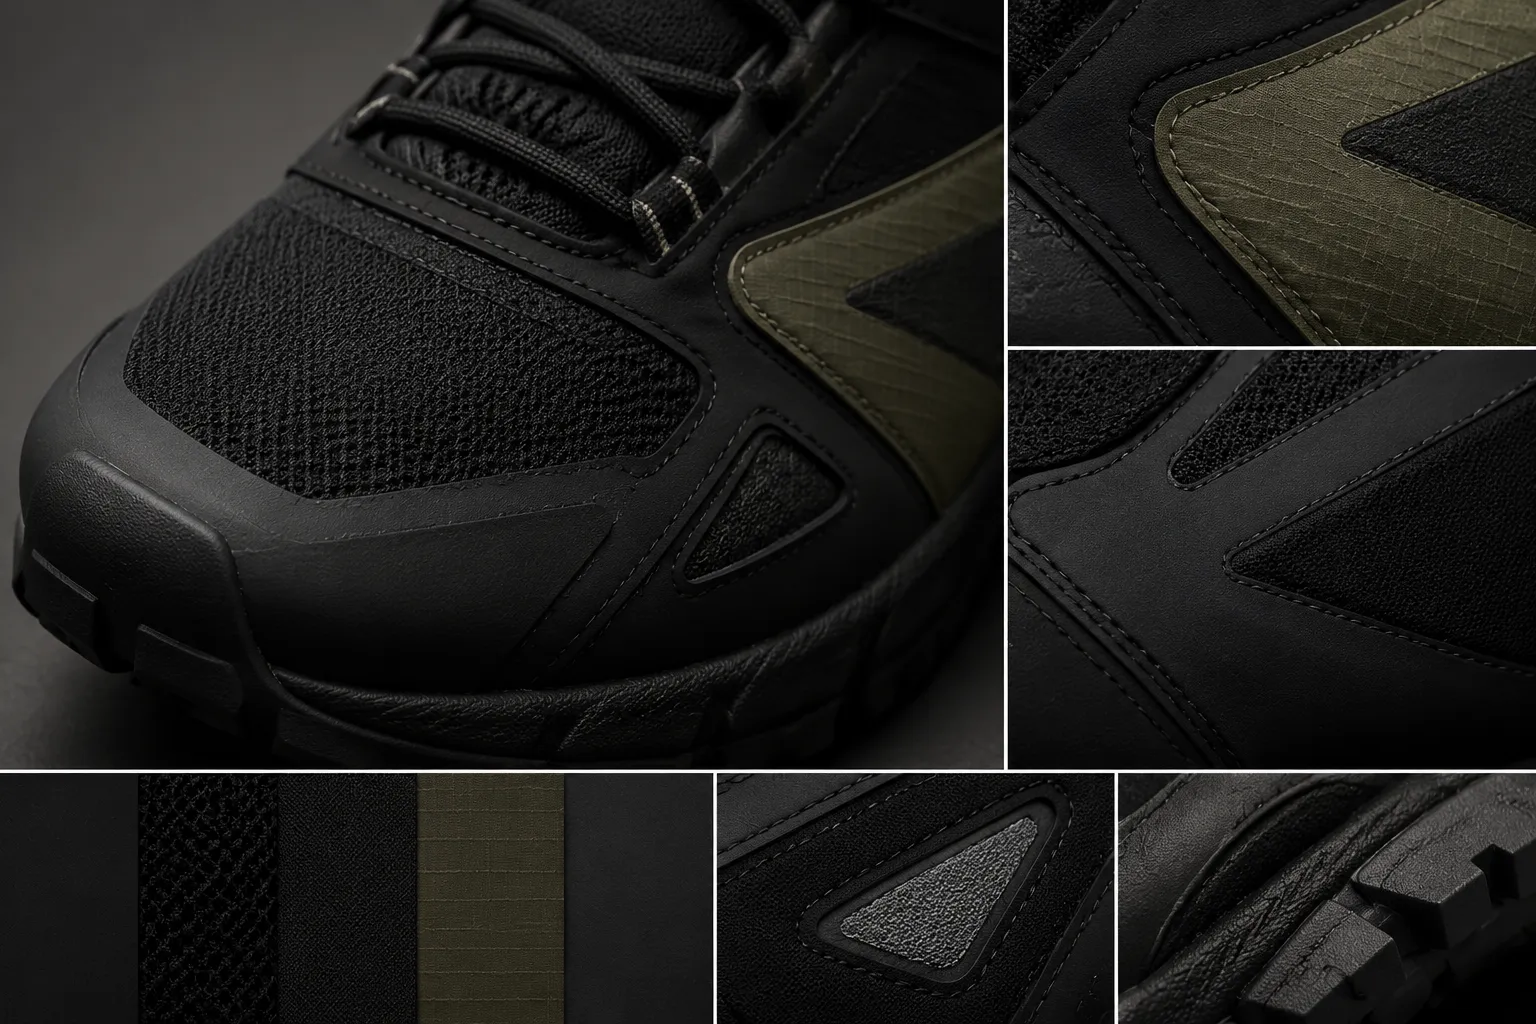
| Detail render view | Material and construction cues | Stitching, overlays, edge treatment, texture, wrinkles, bonding intent | A close crop can exaggerate detail or lose its relationship to the whole shoe |
| Comparison render view | Variant difference | Colorway changes, panel swaps, logo changes, material substitutions, proportion deltas | Inconsistent camera, lighting, or scale can create false differences |
Use the views together rather than treating one frame as decisive. Complementary perspectives may reduce missing or occluded visual information, but they do not remove every blind spot.
What Each View Should Make Visible
Front Render View
The front frame carries the initial silhouette read. Check whether the toe shape, tongue, and front-facing color blocks remain legible at the intended viewing size.
A failure signal is a frame dominated by a dark mass, bright highlight, or centered logo. Request revision when the toe treatment cannot separate from the background or the upper zoning collapses into one tone.
This view supports a decision about shape and color balance. It does not confirm internal volume, fit, or forefoot comfort.
Side Render View
The side frame usually carries the clearest profile read. Inspect the heel-to-toe line, collar, eyestay, overlays, midsole, and outsole relationship.
Revise the view when the camera is too high, too low, or too oblique for comparison with another variant. Keep camera, crop, scale, and lighting consistent across comparison frames.
The side image suggests proportion and construction intent. Questions about bending, foot support, or motion belong to later physical review.
Rear Render View
The rear frame separates heel geometry from the side silhouette. Check the collar opening, rear seam, heel branding, heel-counter appearance, and left-right consistency where both shoes are shown.
Request this view when the brief includes a visible heel structure, rear logo, pull tab, or color break that the side frame obscures. A crop that is too close may hide the heel’s relationship to the rest of the upper.
The render shows external appearance only. Internal components and physical heel behavior remain unresolved.
Top Render View
The top frame makes upper zoning easier to inspect. Check the tongue, vamp, throat, lacing path, toe-box outline, and the relationship between the opening and surrounding panels.
This view is useful for layered overlays, asymmetrical lacing, a large tongue graphic, or a distinctive vamp material. Revise it when highlights erase the lace path or the opening is hidden by the camera angle.
Top coverage does not establish the foot-shaped volume inside the shoe. Route that question to physical design review or sampling.
Outsole Render View
The outsole frame supports a design discussion about visible tread intent, rubber-zone separation, perimeter shape, and bottom graphics. Request it when the outsole is a meaningful design element rather than an unseen surface.
A common coverage failure is an outsole represented only by a thin edge in the side view. Another is a bottom frame with insufficient contrast between tread blocks and the base surface.
The image may show pattern and segmentation. It cannot establish traction, abrasion resistance, flexibility, or safety.
Detail Render View
Detail views should answer a named question. Useful crops include:
- Panel boundaries and overlay transitions
- Stitching runs and seam placement
- Material texture and surface response
- Edge thickness or folded-construction intent
- Wrinkles, perforations, mesh, or molded features
- Branding placement and scale
A detail crop fails when it is attractive but unassigned. Label each crop with the decision it supports, the variant shown, and whether the material appearance is conceptual.
Footwear CAD research treats panel boundaries, stitching, compressed edges, texture, wrinkles, and overlaps as visually significant surface cues. That supports closer inspection of these features, but it does not make a rendered construction physically verified.
Comparison Render View
Comparison frames should isolate differences rather than encourage general taste judgments. Use a shared camera and lighting setup where possible.
Compare by decision-relevant deltas:
- Same silhouette, different upper zoning
- Same panel layout, different material cue
- Same color family, different accent placement
- Same outsole shape, different tread graphic
- Same upper, different collar or tongue treatment
Revise the comparison when camera distance, perspective, shadow density, or background color changes between variants. Those changes can obscure whether the concept itself changed.
Inspection Views for the Review Room
Silhouette Inspection View
Use front, side, and rear views to inspect the outline. Look for continuity in the toe, waist, heel, collar, and sole profile.
- The toe shape changes unexpectedly between views.
- The heel appears wider or narrower without an intentional design change.
- The midsole line disappears into shadow.
- The outsole edge is cropped.
- The camera perspective prevents meaningful comparison.
Mark the result as approve, revise view setup, or request additional angle.
Upper Zoning Inspection View
Use side and top views to separate panels, overlays, eyestays, tongue, vamp, and collar zones. Add detail crops where boundaries or stitching carry the design.
A boundary that disappears in the image is not necessarily absent from the design. Lighting, material similarity, camera position, or insufficient resolution may be responsible. Record the uncertainty instead of reading the missing edge as a construction decision.
Color Relationship Inspection View
Review the colorway as a relationship between zones, not as isolated swatches. Check whether the primary body, accent, outsole, lining, logo, and stitching remain distinguishable.
Reflections, background color, and highlight intensity can shift the apparent relationship. Use a controlled color reference or approved project swatches for comparison. The render remains a visual direction and does not settle final color matching across displays, materials, or samples.
Material Cue Inspection View
Look for differences in sheen, roughness, weave, grain, translucency, softness cues, and edge response. The surface should communicate intended contrast between zones without implying tested material behavior.
Questions about durability, breathability, water resistance, or physical hand feel belong to material selection, sampling, engineering review, or appropriate testing.
Variant Difference Inspection View
Place variants in a consistent grid or sequence. Identify the exact changed elements and keep unchanged elements stable.
A useful annotation names the variant identifier, changed panel or component, intended color relationship, intended material cue, camera and lighting status, and decision required from reviewers.
Render Coverage Failure Signals
Request revision when any of these conditions blocks the intended decision:
- A major silhouette area is hidden in every supplied view.
- Front, side, and rear frames use incompatible perspectives.
- The outsole appears only as a narrow edge.
- Upper panels merge because color, light, or texture provides insufficient separation.
- Material differences appear only through dramatic reflections.
- A detail crop has no named review purpose.
- Variants cannot be compared at the same scale.
- A shadow conceals a seam, overlay, or edge required by the brief.
- The background changes the apparent color relationship.
- The set omits the view needed for the next approval decision.
Not every gap requires another angle. Some require a material study, revised lighting, a CAD review, a physical sample, or a test.
The Handoff Record
Attach a short record to the render set:
- Review stage: concept direction, design review, engineering discussion, sampling request, or campaign mockup
- View inventory: supplied front, side, rear, top, outsole, detail, and comparison views
- Decision covered: the visible question each view answers
- Unresolved visual issue: what remains hidden, ambiguous, or inconsistent
- Source record: the origin of reference images, materials, logos, or other supplied assets
- Rights status: documented permission or license information where known; otherwise mark the item for rights review
- Next owner: designer, CAD or engineering team, sample team, testing team, or rights reviewer
- Disposition: approve concept direction, revise render set, request missing view, or hand off for the next review stage
Rights status belongs in the record, not in an assumption based on image visibility. A complete angle set does not establish permission to use a reference, mark, photograph, or material image.
What the Matrix Cannot Decide
A well-covered render set can improve review clarity. It cannot replace the evidence required for physical product decisions.
- Whether the physical shoe fits the intended foot shape
- Whether it feels comfortable during use
- Whether it withstands expected wear
- Whether the construction meets engineering requirements
- Whether the outsole behavior suits its intended context
- Whether the design can be manufactured as shown
- Whether a sample matches the render in color and material response
- Whether performance, safety, or durability statements have suitable test support
- Whether external visual assets have documented permission
Approve the concept only for the decisions the images visibly support. Move physical, engineering, sampling, testing, and rights questions to their named owners.
A Usable Disposition
- Approve: the required visible decisions are covered and comparable.
- Revise: the direction is reviewable, but camera, lighting, crop, or contrast obscures a needed cue.
- Request: a missing front, side, rear, top, outsole, detail, or comparison view blocks the decision.
- Handoff: the visual question is answered, while fit, geometry, construction, material behavior, rights, or performance belongs to another stage.
The practical role of footwear render angles is to expose the design questions images can answer, record the unresolved ones, and route each item to the proper next stage.